Showing posts with label Antenna Launcher. Show all posts

Monday, February 16, 2015

Improved Pneumatic Antenna Launcher

About four years ago I built a pneumatic antenna launcher that launched small tennis balls into trees for raising wire antennas.  You can find that earlier post >>here<<.

Recently a friend sent me a link to KR4LO's "Air Boss" Antenna Launcher which uses small 2 oz. "egg sinkers" in lieu of tennis balls.  The Air Boss looks like a well thought out design with great range, and for the price, an excellent deal.

But I already had a launcher that I'd built.  It got me thinking, though...could I modify mine to use the same approach?

Yes, I could.  And I did.  Here's the new design...


The barrel is now a 3 foot length of 3/4 inch diameter schedule 80 grey plastic pipe (threaded at both ends), cut down to about 30 inches (explained below).

My first iteration used white 3/4" diameter PVC pipe for the barrel (1/2" was too narrow), but its inner diameter was slightly too large -- too much air was escaping around the sides of the 2 oz. egg sinker I was using as a weight, compromising its range.  I had to wrap about 7 turns of masking tape around the "waist" of the sinker to bulk it out enough to get a good seal in the pipe (the sinker was still loose inside the barrel, but not too loose).

Compared to the white PVC pipe, the grey pipe has a slightly narrower inner diameter (and it seems stiffer, too -- less likely to bend).  So the egg sinker fits into it better, but I still add about 2 turns of masking tape around the waist of the egg sinkers, but this additional bulking-out might not be needed.

The barrel attaches to a 3/4 inch PVC ball valve (threaded, female connections), so, for storage, it's very easy to unscrew the barrel from the air-chamber/valve assembly.  Note:  my original design used a 1/2 inch ball valve.  This meant that I had to adapt the threaded 3/4" threaded pipe to the 1/2" ball valve.  Which I did.  Unfortunately, during testing I snapped off one of the glue joints near that valve.  Rather than rebuild it with the same 1/2" valve, I thought it better to use a valve that could mate directly with the barrel, without adapters.

This new ball valve is a bit stiffer to turn than my original one.  I was worried that this meant I couldn't turn it as fast, and therefore the "explosion" of air when I opened it wouldn't be as powerful.

I tried lubricating the ball with "Faucet and Valve" grease, but this didn't seem to have any effect.  So I instead jury-rigged a handle-extender with a piece of scrap kindling and a hose clamp:


Not elegant, but it seems to work.

The reel is inexpensive, purchased at Walmart.  The reel came with a cheap no-name, no-spec line pre-installed.  I removed this line and installed in its place 30 lb. test "Spiderwire" braid (about 125 yards).

The fishing reel is attached to the barrel with a couple of hose clamps.

The fishing weights are 2 oz. egg sinkers (I picked mine up at Walmart).  I didn't want the fishing leader to pass on the outside of the sinker, so it runs only inside the sinker, with lead split-shot clamped on the leader at either end to keep the sinker from moving around:


One thing I've learned with antenna launchers, be they sling-shot, pneumatic, or whatever...if you aren't careful, you can get your weight (or tennis ball, etc.) stuck up in a tree.  For me, this usually happens when I'm not satisfied with where the shot went -- then I try to pull the line back (with weight still tied to the end of the line) so that I can try again.  The weight will start swinging on the end of its line (like a pendulum) as I'm pulling it up through the tree branches, and then suddenly, it's done a loop-de-loop and wrapped itself around a branch!  Arrrgh!

This time I wanted to improve the system:
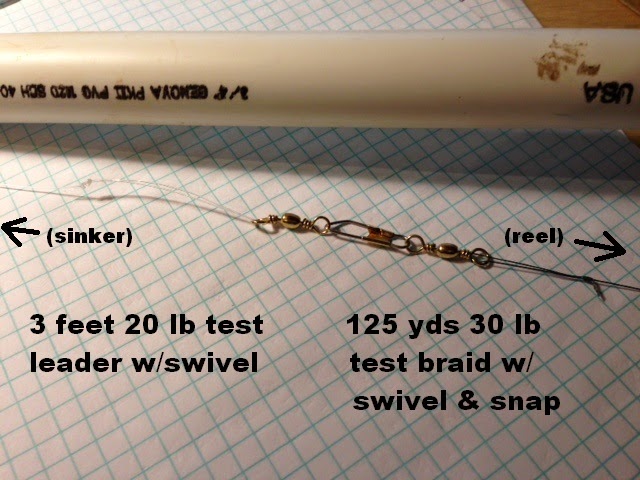
  • The weight is attached to a short length of leader (about 3 feet), at the other end of which is attached a barrel-swivel.
  • The main line (attached to the reel) has a barrel-swivel with snap at the end to which the leader will attach.
  • Prior to making a shot, the leader's barrel-swivel is clipped to the line's snap.
  • Then, after the shot has been made but before reeling a line back, simply unsnap and remove the weight and leader.  No untying knots!!!
Here's an image of the swivels and snap:


Note:  For the sinker's leader I first used some light weight mono-filament line that came with the inexpensive reel I'd purchased.  My thinking:  because I was using 30 lb. test line for my main line, if my sinker did get stuck in a tree, I wanted something that, if I pulled on it hard, would break before the 30 lb. line broke.

Unfortunately, this unknown line I used as my leader was just a bit too light weight.  On my second test shot, it parted and the sinker went sailing over the tree and out of sight.

The red arrow points to where the leader's new end.


Lesson learned.  Now I'm using 3' leaders (purchased at Walmart) that are 20 lb. test and have a barrel-swivel at one end and a barrel-swivel-with-snap at the other end.  I remove the swivel-with-snap from its end of the leader -- it's on this end that I'll attach the egg sinker.  (I can then attach one of these swivel-with-snaps to the end of my main line).  Also -- the 3 foot leaders I used come with loops in the line at their 1 foot and 2 foot marks (for attaching other hooks, I suppose).  I clip the loops open to prevent them from snagging on branch stubs, etc.

Here's a photo of the leader.  If you look closely you can see the two loops before I clipped t hem:

(click on image to enlarge)

Note regarding the leaders:  after about two dozen shots into trees, my leader (see the photo above) separated at one of the pre-installed loops -- I'm guessing that the knot used to make a loop weakened the mono-filament and it eventually parted.  For this reason, if I build more 2 oz weight leader assemblies, I'll probably just use 3 feet of the 30 lb Spider braid (that I use on my reel) in lieu of the mono-filament.

For better visibility, I spray painted the weights fluorescent orange:

Hot chile peppers in the blistering sun...
(with apologies to Dylan)

If I'm unsatisfied with the shot and decide to reel back the line for another go, I first unsnap and remove the leader and its weight and then I attach a short length of Flagging-Tape to the snap (this could be a short length of rope or string, too -- just something to add some weight to the end of the line).  This acts as a bit of drag on the end and  helps keep the snap-end of the line from flopping around and possibly wrapping around something as I'm reeling it back in.  (That's my theory, at least.)


Other notes:
  • Always close the snap before reeling the line back!
  • The grey 3/4" barrel was cut down from its length of 3 feet to about 30 inches so that, when the sinker has dropped down inside the barrel all the way to the barrel's bottom (make sure the valve is closed, or you'll drop through to the air chamber!), the swivel on the leader is just outside the barrel, not in the barrel.
  • Useful knots:  Double-surgeon's loop knot (great for attaching swivels or making slip-knots), and the uni-uni knot (for splicing line together, which I discovered I needed to do when my more-than-200-feet of line on the reel (which I thought would be adequate) came up short in one of my shots over a very tall tree.  I'm now using the entire 125 yards of the purchased Spiderwire.) 
Final results...I can easily clear the tree in the picture below...


But how high can I get it?  The tree in the photo below is significantly higher than the one in the photo above. With 50 psi of pressure, maximum height that I can achieve seems to be on the order of 90 - 100 feet, per this photo (after shooting the weight over the branches, I reeled up the flagging-tape "tail" until it seemed about at its max height).  Note that the measurement below doesn't take into account perspective, so actual height could easily be over 100 feet:

(click on image to enlarge)

Much better than my tennis-ball antenna launcher, but can height be improved?  I'm hopeful, but nothing I've tried has yet made a significant difference. 


Standard Caveats:

Use at your own risk.  If you build one of these, don't overstress the PVC by pumping in too much air (I usually pump it up to about 40-50 psi).  Also, follow the instructions with the PVC glue, and, after handling the lead sinker and split shot, I'd recommend washing your hands.

Plus, when the weight descends, it has a lot of energy.  It has buried itself a good half-inch into the back lawn here -- I almost thought I'd lost it, then ran into the fishing line leading down into a hole in the ground.  So when you're aiming, pay attention to where it could fall!

All of which is to say: use common sense!

And, as always, I might have made a mistake in my equations, assumptions, drawings, or interpretations.  If you see anything you believe to be in error or if anything is confusing, please feel free to contact me or comment below.

And so I should add -- this design and any associated information is distributed in the hope that it will be useful, but WITHOUT ANY WARRANTY; without even the implied warranty of MERCHANTABILITY or FITNESS FOR A PARTICULAR PURPOSE.

Thursday, June 9, 2011

Quickie Pneumatic Antenna Launcher

[21 Feb 2015 Update:  for an improved design, please see this newer post:  Improved Antenna Launcher.]

I need to get wire-antenna supports up into some tall pines at a remote location, and the slingshot that I would normally use to do this is at my brother's house. So...in its absence I thought I'd instead make a "pneumatic antenna launcher" to help me get the supports up into high tree branches.

A quick Google search revealed a number of plans for pneumatic antenna launchers, the most common using 2.5" PVC pipe. Although these designs were usually pretty fancy (using adapted sprinkler valves to trigger the launchers), I thought they might form the basis of a simpler design that I could quickly assemble. So off to Home Depot I went to pick up some 2.5" PVC and accessories.

Unfortunately, when I arrived I discovered that the local Home Depot only has Schedule 40 PVC pipe up to 2" inner-diameter, but not 2.5" pipe.

Well, why not use 2" pipe? With this diameter in mind, I searched through the bins of various PVC couplings and parts, designing the launcher in my head as I discovered what bits and pieces Home Depot had in stock.

With money dispensed, home I went, and not much later I had my launcher! Here it is:

(Click on image to enlarge)
The air-chamber and barrel are made from 2" I.D. Schedule 40 PVC pipe. Overall length is 90 inches. The barrel is 32 inches long, and the air-chamber is 52 inches long (roughly 2.5 quarts in volume).

I chose 2.5 quarts as a compromise between air-volume and length of the chamber. Other designs that I found on the internet seemed to use a volume of about 3 quarts for their air chambers, but, with 2" PVC pipe, this would require a chamber length of 60 inches, which I thought would make the overall launcher a bit too unwieldy. So I shortened it up a bit, which, for me, puts the "trigger" at a nice height when the end of the launcher is resting on the ground.

For the "trigger," rather than try adapting an expensive sprinkler valve as others had done, I went with a low-tech, low-cost ball valve which I'd seen used in the following photo of a potato launcher.

(Click on image to enlarge)
James and Devin with potato launcher (circa 1999?)

I chose a 1/2" ball-valve after I discovered, while testing various size valves at Home Depot, that it was the one that I could turn the easiest:

(Click on image to enlarge)


The 1/2" ball-valve is threaded at both ends. To connect it to both the 2" air-chamber and the barrel, I screwed into each end of the valve 1/2" (threaded) to 3/4" (female slip) adapters (with a generous amount of Teflon pipe-tape on the threads), and then I glued short lengths of 3/4" PVC pipe into the slip-joint ends of these adapters. In turn the other ends of these short lengths of 3/4" pipe are glued into 3/4" (slip) to 2" adapters. The barrel and the air-chamber connect to these 2" adapters via 2" slip couplings (again, glued).

Note that the threaded couplings allow the launcher to be disassembled for easier transport. And, should I ever decide to change to a fancier trigger mechanism, they would allow me to easily swap out the original ball-valve trigger for something different.

To fill the air-chamber I used a Presta valve from an old bicycle inner-tube that I had lying around. It's threaded and has a nut, which eases its installation.

(Click on image to enlarge)

A Schrader valve would have been preferred, as Presta valves are a bit fragile, but the Presta valve was what I had on hand.

To ensure a good seal between the valve and the air-chamber pipe, I cut out two pieces of the bicycle inner-tube rubber, each piece roughly a circle 1" in diameter. Into the center of each piece of rubber I cut a small hole slightly smaller than the diameter of the Presta valve. I pressed these each over the valve and worked them, one at a time, down the stem to the end that would be within the air-chamber pipe.

I drilled a small hole in the pipe just past the point where the end-cap would stop (do NOT attach the end-cap yet before you install the valve!), and then I inserted the valve into this hole. With its nut tightened down, the rubber "gaskets" I'd made provided a good seal against the inside of the air-chamber.

After I'd installed the valve, the air-chamber was capped off with a 2" PVC cap, glued in place.

Because the pipe is only 2" in diameter, I couldn't use normal size tennis balls. A visit to Jon, K6JEK, and his wife revealed exactly what I needed. Their dog Buster likes to chase 2" tennis balls.

(Click on image to enlarge)

I tested one of these tennis balls in the launcher, and it worked great! Buster was too attached to his tennis ball for me to try to take it (and his others were chewed beyond recognition), so it was off to the local Petco (pet supply) store to search for more 2" tennis balls!

(Click on image to enlarge)

The yellow balls are a bit softer than the blue/pink ball, and they are "squeaky" toys. I drilled a couple of holes in one so that I could insert a tie-wrap to use as an attachment loop. Then, at the other end, I cut a thin slit with an X-acto knife so that I could insert pennies to add weight. Per another website, the ball should weigh between 4 and 5 ounces (as the best tradeoff of height, safety, and the ability to pull the line down over tree branches and foliage). Getting it up to 5 ounces pretty much fills up a 2" tennis ball with pennies! (Each penny is roughly 0.1 ounces).

Here's a finished tennis ball, with tie-wrap attachment loop:

(Click on image to enlarge)


Using a bicycle tire-pump, I've tested my chamber up to about 80 psi and it seemed to hold its pressure fine (at least for the time it took me to insert a ball and launch it). The 2" pipe itself is rated to 280 psi (and the 3/4" pipe to 480 psi), but the ball-valve is only rated to 150 psi. I'd recommend keeping the max pressure well below this point, though.

A small paint bucket can be used to hold the line and keep it from becoming entangled in ground debris (e.g. twigs and leaves). Tie one end of the line to the bucket handle!

(Click on image to enlarge)

Results:

Shooting the weighted 5 oz. tennis ball straight up into the air resulted in the following heights:
  • 20 psi: 15 feet
  • 40 psi: 35 feet
  • 60 psi: 65 feet
(Note: I only tested once at each psi level. Heights are approximate, based on a rough measure of how much line played out).

While erecting my 80 meter full-wave loop, I discovered that I needed the ball to be heavy so that, if it were in an environment with many branches, it had a better chance of pulling down the line attached to it. I had started with a 4 oz. tennis-ball load, but finally decided I was better off with the ball loaded with as many pennies as I could fit into it. The result is a ball which weighs about 5.5 oz.

Even at this weight, sometimes the ball wouldn't drop all the way to the ground, and I would have to "finesse" it down by wiggling the line or trying other tricks. And sometimes I just had to pull the ball back and start over again. Perhaps a more "slippery" line might have helped the ball descend, but in the end I was able to get all of the supports up and the loop raised without either having the ball become permanently stuck in a tree, or my having to run to the store to purchase yet one more thing.

Ready, aim...

Notes:

1. Mechanically, the weakest point is the smaller-diameter pipes and adapters that make up the trigger mechanism: this is where you'll see the launcher bending. To protect these parts when transporting or storing the launcher, I'd recommend unscrewing the barrel from the ball-valve, and not unscrewing the air-chamber. Keep the air-chamber screwed into the ball-valve, because it's important to maintain a good air-tight seal at the threads to prevent pressure loss.

2. More height-per-psi might be achievable with a better (faster) trigger mechanism (e.g. adapted sprinkler valve), but I'm satisfied with my results -- they work for my application, and the design is very simple and easy to construct. Also, because the tennis ball is narrower than 2", air can escape around it as it's moving through the barrel. Some sort of circular disk to minimize escaped air (say, made out of an old mouse pad?) first placed at the bottom of the barrel with the ball then inserted so that it's lying on top of it might improve performance. But in the end I've decided that all I really need to do is add a few more psi with my bike pump to get the heights I need.


Resources:
  1. Here (An excellent site!)
  2. 2" ID launcher
(Googling "spud gun," "potato gun, and "tennis ball launcher" will provide other sites with great ideas, too.)


Caveats:

If you build one of these, use common sense and, above all, use at your own risk! Follow instructions for gluing PVC, allow adequate curing time, and, when finished, don't overstress the PVC by pumping in too much air!