Showing posts with label VNC. Show all posts

Friday, August 21, 2020

Remote WSPR and FT-8 with a Raspberry Pi behind a DSL Modem/Router (NVG510) with Google WiFi

This is my third blog post on running WSPR (and FT-8) remotely using a Raspberry Pi connected to a Transceiver.

The first blog post (here) describes a basic setup in which the Raspberry Pi and the device controlling it (e.g. a laptop, a tablet, or a smart-phone) are all on the same network.  For example, the Raspberry Pi and Transceiver could be in one room of a house and WSPR operation could be controlled and monitored using a tablet from another room.

The second blog post (here) expands upon this concept, but rather than controlling and monitoring from a device on the same network as the Raspberry Pi, the Raspberry Pi and Transceiver are controlled via the internet from a location not associated with the local-area-network to which the Raspberry Pi is connected.  In other words, it could be controlled from across town, or across the state, or from a different country.

In the second post the Raspberry Pi (and transceiver) were attached to a local-area-network behind a 5031NV DSL Modem Router.  In this third blog post, I'll discuss a similar setup, but with the Raspberry Pi (and transceiver) behind an NVG510 DSL Modem/Router using Google Wifi in lieu of the Modem/Router's built in WiFi function.

This is the setup:

The network whose setup for remote control I will be discussing is the "Far End" network.  It is controlled from the "Near End" using (in the example shown) a laptop running VNC Viewer. which allows the user at the Near End to interact with the Raspberry Pi's desktop at the Far End.

(Note:  the IP addresses shown in RED are not the real IP addresses.  I've assigned these numbers for purposes of illustration).


Why does the Far End use Google WiFi?

The NVG510 Modem/Router provides internet to our property in Nevada City, California.  There are several structures on this property which require access to this internet, and the NVG510's integrated WiFi does not supply adequate coverage to all of the wireless devices needing it.

On the other hand, the Google WiFi mesh network provides us the coverage we need.

The Google WiFi was purchased several years ago and it consists of three puck-like devices.

One of these pucks connects via an Ethernet cable to one of the Ethernet ports on the back of the NVG510 Modem/Router.

The other two pucks can be located anywhere within range of the first puck -- they do not need to be connected to the NVG510.

The three pucks, operating together, form the WiFi mesh-network.


1.  Setting up the NVG510:

To use VNC Viewer to remotely control and monitor the Raspberry Pi, the VNC application on the Raspberry Pi must have two-way communication through the NVG510's firewall.  To allow this access, I set up the NVG510 using the following steps:

First, it is necessary to log into the NVG510 locally via its control IP address.  Its IP address follows the "For Advanced Device Configuration go to:" line on a sticker on the side of the unit.

At the window which appears, go to the "Firewall" tab and click on the "NAT/Gaming" tab on the line under it:

Clicking on the "NAT/Gaming" tab should bring up a login screen requiring a "Device Access Code".  This code is also found on the side of the NVG510:

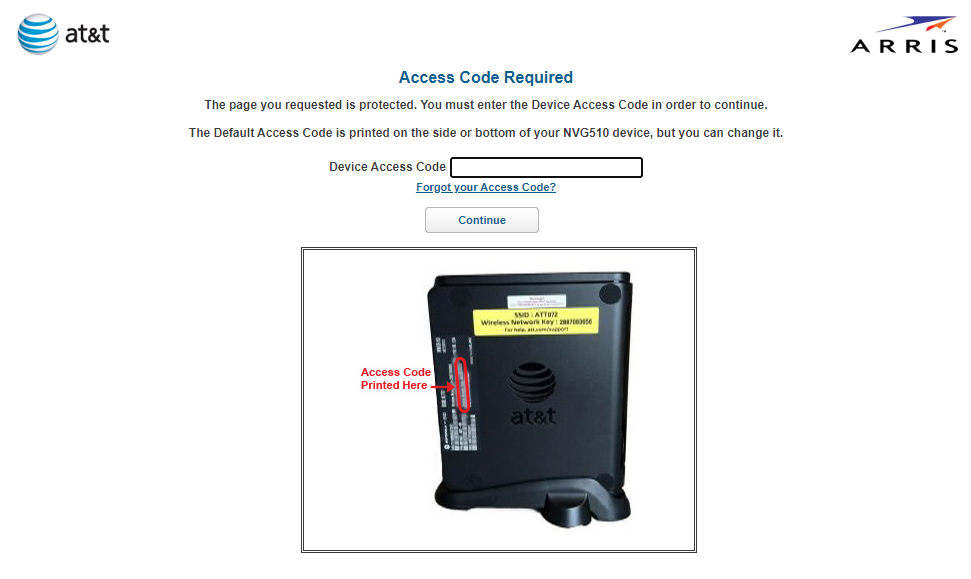
Entering the "Device Access Code" will bring up the NAT/Gaming window:

Note that the blue bar under "Hosted Applications" states, "No Application Hosting entries have been defined."

Scroll down the "Service" pull-down menu until you find the entry for "VNC, Virtual Network Computing" and select it.

Then go to the "Needed by Device" pull-down menu and select the Google Wifi device.  In my case, this was the only device on the list.  Note that it can be identified as a Google device by the first three pairs of digits in its MAC address (this MAC address is shown scrunched together at the end of the entry, above).  (If you have these three pairs of digits, you can google which company they are assigned to.  In my case d8:6c:63 is assigned to Google.)

Then click on the "Add" button.  The window should be updated to show the following.  

Note that VNC is now listed as a hosted application.


Next, go to the "IP Passthrough" tab under the "Firewall" tab.

At the "Allocation Mode" pulldown menu, select "Passthrough".

At the "Passthrough Mode" pulldown menu, select "DHCPS-fixed".

And at the "Passthrough fixed MAC Address" select the Google Wifi device (which, in my case, is the only device on the list).

Then click "Save".  

The screen should update to show that the changes have been saved and that you should restart the Modem/Router.

But don't click on "restart" yet.

Before clicking on Restart, let's first go back to the NAT/Gaming tab (still under the Firewall tab) and take a look at how it has changed:

Now click on "Restart".

(By the way -- be sure to do the Passthrough assignment step after the VNC application selection step.  That is, follow the steps in the order I've shown them, above.  If you reverse the order of these two steps you might not be able to assign the VNC application to a device, even if that device is "passthrough".)


Step 2, Setting Up Google WiFi:

Using the Google WiFi app (which is on my tablet and my smart-phone), I did the following:

1.  Go to Settings > Network and General > Advanced networking > Port management.

2.  Click on the "+" (to add).

3.  Find the Raspberry Pi on the list, select it (so that a check-mark appears), then tap "Next".

4.  Select "TCP & UDP" under "External Ports"

5.  Then touch "Internal Ports" and at the text-prompt type "5900" (which is the port number for VNC).

6.  Then tap "Done".

This new "port management rule" should now be saved on the Google Wifi.


Step 3:  Verify that Port 5900 can be seen from the Outside World:

Go to the website "canyouseeme.org" and enter in the Modem/Router's public IP address and "5900" as the port to check.  Then click on "Check Port".

(Note that if you have forgotten the public address to use, you can first look it up on the Modem's control panel, as shown below.)


If everything has been configured correctly, you should see a green "Success" appear on the screen, as shown, below:


Step 4:  Access the Raspberry Pi using the VNC Viewer App:

On your controlling device, open the VNC Viewer app and enter in the Modem/Router's public IP address and "5900", separated with a colon (:) and hit <ENTER>

Continue through the "warning" screen that might appear.  The Raspberry Pi's desktop should then appear in a window on your remote device (laptop, tablet, etc).

That's it!

Done!


A Note on Security:

Important:  allowing VNC Viewer to access the Raspberry Pi from the world outside your router presents a security risk.  The Raspberry Pi's Port 5900 (its VNC port) could now be accessed and your Raspberry Pi, via VNC Viewer, controlled by someone else.  For example, an unknown third party could possibly load software onto your Raspberry Pi that might monitor your network's internal WiFi traffic.

At a minimum, change the Raspberry Pi's password from the default "raspberry".  Or go into the VNC settings and change VNC's password there (under Options>Security -- note that if you select "VNC password" in lieu of "UNIX password", there will be no Username field at the login)
.

Standard Caveat:

I might have made a mistake in my designs, equations, schematics, models, etc. If anything looks confusing or wrong to you, please feel free to comment below or send me an email.

Also, I will note:

This design and any associated information is distributed in the hope that it will be useful, but WITHOUT ANY WARRANTY; without even the implied warranty of MERCHANTABILITY or FITNESS FOR A PARTICULAR PURPOSE.


Monday, August 17, 2020

Remote WSPR with a Raspberry Pi behind a DSL Modem/Router (5031NV)


This blog post continues my setup of a remote WSPR station using a Raspberry Pi and my FT-1000D transceiver.

The first blog post describes remote operation when operating within a local area network, for example, when the transceiver and Raspberry Pi are in one room of a house and you are controlling them from another room via a wireless router.

Here is an example of that basic setup:

In this blog post control of the Raspberry Pi will not be done locally, but over the internet from a second network (or using a cellphone), as shown, below:

The Raspberry Pi and Transceiver are at the "far end" of the internet link, on a local-area-network that is behind, in my case, a DSL Modem/Router (Pace Model 5031NV).

My laptop (or tablet device, etc.) is on a separate local-area-network (the "near end" network of the internet link).  With it I monitor and control the far end WSPR operation using "VNC Viewer", as described in my first blog post.

At the near-end, "VNC Viewer" on my laptop must have a two-way communication's link with the Raspberry Pi at the far-end.  To do this, I need to set up my 5031NV DSL Modem/Router to allow the VNC application two-way communications through the 5031NV.

This blog post describes the set up of my 5031NV Modem/Router to provide the two-way VNC link through it.


Step 1:  Access the 5031NV's Configuration Controls:

To set up my DSL Modem/Router, I first need to access its configuration "panel".  To do this, I enter into my laptop's browser the "For Advanced Configuration" IP address printed on the label attached to the modem/router's side cover.

If I've correctly entered the modem's IP address into my browser, I should see the following "home" screen:

(The text in red represents information that I've changed for privacy purposes.  For example, my network's name really isn't "JCA1234".)

Note that  "raspberrypi" is one of the devices listed in the "Home Network Device Lists" at the bottom of the screen.


Step 2:  Allowing access to the VNC Application on the Raspberry Pi:

Next, I want to enable two-way communication through the Modem/Router for the VNC app on my Raspberry Pi.  (This app was automatically installed on my Raspberry Pi by the Pi's NOOBS software).

To do this, I first go to the "Settings" tab and then select the "Firewall" tab.

Under the "Firewall" tab I select "Applications, Pinholes and DMZ", as shown below:

Selecting "Applications, Pinholes and DMZ" will bring up the next window.  Under the "1) Select a computer" heading, choose "raspberrypi". 

Continuing down the screen, do the following:

Under the "2) Edit firewall settings for this computer" select the "Allow individual application(s)" radio-button.

Then, scroll through the Application List until you see the entry for "VNC".  Select it and click the "Add" button.  VNC should then appear as a "Hosted Application".

Next, click on "Status" under the "Firewall" tab.  You should now see:

This screen tells you that you can remotely access VNC on the Raspberry Pi via port 5500, 5800, or 5900 at http://1111.11.11.11 (this latter IP address is a fake one, for privacy purposes).

If you'd like, you can do a quick check by returning to the "Home" screen and clicking on the "Details" button for "raspberrypi".

You should be taken to the "LAN" tab under the "Settings" tab and see something that looks like this:

(Again, information in RED is not my actual network's information.  I've changed it for privacy).


That's all there is to this Modem/Router's setup!  My 5031NV Modem/Router will now allow remote access to my Raspberry Pi's VNC app.

The next step is to try it out...


3.  Logging in to VNC on the Remote Raspberry Pi:

To login to the remotely-located Raspberry Pi, open the VNC Viewer app on your "near-end" control device (e.g. laptop, tablet, smart-phone, etc.) and enter in the "Public IP", then a ':' (colon), and a VNC "Port Number".

In my case, the Public IP address is 1111.11.11.11, and I've chosen Port 5900 (see info on the previous image), so I would enter "1111.11.11.11:5900", as shown, below:

After hitting <ENTER> (and possibly getting a warning screen, which I just ignore), I then see my Raspberry Pi's desktop on my remote device!


That's it!  Done!


A Note on Security:

Important:  allowing VNC Viewer to access the Raspberry Pi from the world outside your router presents a security risk.  The Raspberry Pi's Port 5900 (its VNC port) could now be accessed and your Raspberry Pi, via VNC Viewer, controlled by someone else.  For example, an unknown third party could possibly load software onto your Raspberry Pi that might monitor your network's internal WiFi traffic.

At a minimum, change the Raspberry Pi's password from the default "raspberry".  Or go into the VNC settings and change VNC's password there (under Options>Security -- note that if you select "VNC password" in lieu of "UNIX password", there will be no Username field at the login)
.

Standard Caveat:

I might have made a mistake in my designs, equations, schematics, models, etc. If anything looks confusing or wrong to you, please feel free to comment below or send me an email.

Also, I will note:

This design and any associated information is distributed in the hope that it will be useful, but WITHOUT ANY WARRANTY; without even the implied warranty of MERCHANTABILITY or FITNESS FOR A PARTICULAR PURPOSE.