Tuesday, January 15, 2008

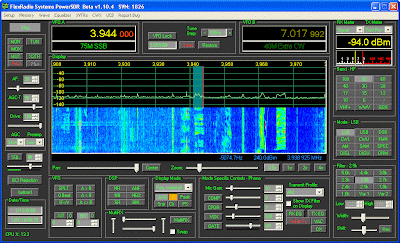
Console can now be resized.

(Click on image to enlarge.)

OK, as of 15 Jan 08, my branch (k6jca) of the SVN repository contains code to allow the Console (well, actually the Display) to be resized. The Console can be "stretched" horizontally and/or vertically (the controls are independent). When stretching, only the Display will increase in size along with the overall Console (and the Pan trackbar will increase in size horizontally, not vertically). All other controls maintain their same size.

The image above shows a Console that's been resized from 1024 x 624 to 1280 x 700. Note the wider and taller display.

The Pan trackbar increases in size to give users better "resolution" when moving the trackbar (it's very sensitive at its stock size).

The Console can be stretched from its stock size of 1024 x 624 (h x v) to a max size of 1920 x 1200). Changes can be made in single pixel increments. Note that the Display size when the Console is 1024 x 624 is 704 x 240. For every step in Console size change, be it vertical or horizontal, the Display changes by an equal amount.

As the Console grows, the controls don't change size, but the spacing between "groups" of controls does change, which (I hope!) gives the Console a more pleasing look than if the groups had been left clumped.

Also - increasing Display size results in higher CPU usage!! If you start experiencing pops or other weirdness, drop the size back down to its original size of 1024 x 624 !!

Give it a try and let me know if you find any bugs or problems. And please vote in the poll for this new feature (see top of this blog).

Thanks!

Monday, January 14, 2008

Selectable Sizes?

Several people have asked me if the Console size can be made selectable. At the time I thought not, but I did some experimenting, and I discovered that, after launching the PowerSDR application, sizes can be changed. Here's an example (click on it to enlarge):


OK - it's still crude (I only added 8 lines of code). But this image shows a Console that is 1280 pixels wide (the max width of my monitor), instead of Flex's current 1024 pixels wide. For experimenting purposes, I changed the width (and the location of various controls) at the end of the initialization routine. The next thing to do is to add a control to the Setup menu to let the user select between 1024 and 1280 (and perhaps other size) wide. Going wider than 1280 is a bit more difficult for me to do, because I don't have a wider screen, and thus seeing how the overall Console looks, when taken as a whole, becomes impossible.

Also - I could just as easily change Vertical Size, too, but at the moment this isn't my main concern - I really wanted to get more horizontal display pixels onto the screen.

And...several people have asked me if I can scale "everything" to fit larger screen sizes. Although possible, it looks like I'd have to go through and individually change, literally, *everything*, (including, for example, the Font size for every button, etc., on the Console). I might be missing some obvious way of doing it (what I don't know about c# would fill the ocean!), but it looks like it'd be a tremendous amount of work, so frankly I can't see doing it.

However, stretching the Horizontal size (and perhaps Vertical), looks like it should be fairly easy to do.

Let me know what size(s) you'd like to see, and I'll see if I can add them...

Sunday, January 13, 2008

Comments on the Polls...

If you would like to make additional comments regarding the Polls above, please make them in the "comment" section of this post (click on the "comments" word on the line below). Thanks!

New Skins for the SDR Console...

I thought I'd try modifying the code to give me more flexibility in choosing how my Console looks. Here's a result of these mods:


(Click on image to enlarge)

I've added four new Color buttons to the setup menu (go to Setup>Appearance>General). The four buttons allow you to change the overall Console background color, the "unselected" button color, the "text" color, and the text "background" (that is, the background in the combo boxes, the text boxes, and the up/down boxes upon which the text for those boxes sits).

And these buttons only change the color of the main Console itself. Colors on other menus, such as the Setup menu, don't change (at least, they aren't suppose to change. Please report bugs!)

I've uploaded the files to the SVN server. If you do an SVN update (you need to get the branches along with the Trunk), you'll find the files in my branch: .../branches/k6jca/Release/bin. Simply click on the PowerSDR.exe file in this folder to launch the new console.

Let me know if you come across any bugs (some of the code is a bit kludgier than I'd like). And let me know what you think!

Thanks...

Friday, January 11, 2008

SDR & Edirol FA-66, spurs etc.

Per reports of spurs when using the SDR1000 with the Edirol FA-66, I thought I'd check them out with my system.

I'm using a Toshiba laptop, and my latest version of k6jca code from the SVN directory (this version has a "Freeze" button which is very useful when making comparisons, as we'll shortly see).

I set up the Console as follows:

o Spur Reduction: OFF
o VFO A: 3.797 000 MHz
o Preamp: MED
o DDS Clock Offset: 0 (Go to "Setup>Hardware Config" tab and click on the "expert" box)
o Waterfall High Level set to -80, and Low Level set to -150.
o Display "Average" turned ON.
o Edirol Sample Rate set to 96 KHz.
o SDR's antenna connector attached to dummy load.

The spurs are shown below (you can click on the image to enlarge it).


The waterfall contains three different configurations. I merged them into one Waterfall display by "freezing" the display while I changed cables (thus the utility of the Freeze button (it's the 'F' button on the display)). The three configurations are:

1) The bottom 1/3 is with the SDR turned OFF (I also get the same thing with the SDR ON and the cables between it and the Edirol disconnected). Note the spur at 3.796 MHz. That's from the Edirol itself.

2) The middle 1/3 is with the SDR ON, and the SDR audio connected directly to the Edirol. Note the numerous spurs. Interestingly, the only spur that moves as I change the VFO in 1 Hz increments is the bright green spur to the right (at about 3.7948 MHz). All of the others are static! I don't know how to explain this - but I suspect that these are generated within the Edirol. My best guess is that this is a ground loop between the Edirol, the PC, the SDR, and their interconnection with the firewire, audio, and parallel port cables. But frankly, I don't know what the cause is, and it could easily be something else. It'd take *alot* more work to figure that out.

3) The top 1/3 is with a Radio Shack Ground Loop Isolator (p/n 270-054) in series with the cable from the SDR's "To Line In" signal and the Edirol inputs (3 & 4). Note that most of the spurs (with the exception of the spur at 3.796 and one further to the right at about 3.7948 MHz) are attenuated.

One test you can do is to tune the vfo in 1 Hz steps (that's Hz, not KHz), and watch if the spurs move, and how much they move by.

Spurs that are picked up by the SDR from external sources will follow in 1 Hz steps, and you can easily follow their movement in the waterfall.

Spurs that jump around crazily as the vfo is stepped from Hz to Hz are most likely DDS spurs.

Spurs that remain stationary are most likely spurs related to the Edirol itself, although I don't have a satisfactory explanation as to why they disappear if the cables are disconnected.

By the way - I also ran the tests with the two switching supplies removed (I turned them off and ran the laptop from its batteries and the Edirol from a bench supply (linear, not switcher)). No change in the spurs.

The above image is presented as an example of what I'm seeing. Others can use it to compare their system(s) to mine, if they think they have a problem.

For the moment, that's it.

Monday, January 7, 2008

Running Log, PowerSDR Console Mods...

15 Jan 08:
1. Added Console resizing (both horizontal and vertical dimensions can be sized independently). Controls are in Setup>Appearance>Display.

13 Jan 08:
1. The "long-tailed" cursor vertical tail now shows in both windows when in "split screen" mode.

2. Added the Peak Needle to all of the "Edge" style meters. And some of these meters have different ballistics (attack and decay times) for their 'normal' needle, because with some meters it's more useful to *not* have the needles behave like normal analog meters.

3. Added four new buttons in the Setup>Appearance>General tab to allow greater customization of the Console look (background, unselected buttons, text, and text background). Might have bugs: some parts are a bit kludgy.


9 Jan 08:
1. Added a "Freeze" button (Look between the Average and the Peak buttons - you'll see a button labeled "F") to freeze display updating. Press it once, the display freezes. Press again; it unfreezes. It also unfreezes if the frequency is changed, filters are changed, go to transmit, or any of a number of other actions (which would normally cause a change in the display) are performed.

Note:
A) When Freeze is pressed, the button turns 'orange'. I use this as a visual indicator to identify controls that are ON (or "activated") which I might want to quickly find later.
B) You cannot take a 'snapshot' of a frozen picture (this might be useful, though - so I'm going to think about how I might be able to do it).

2. Changed the label on my 'Peak Search' button from "Pk" to "PS" (for Peak Search).

7 Jan 08:

1. Added a trackbar in the Setup>Appearances menu to allow setting of Panadapter size when in the combined Panadapter/Waterfall mode. When in this mode, the Panadapter size can be adjusted from 20% to 80% of the display size.

Sunday, January 6, 2008

A few more words...

I just thought I'd take a moment to describe some of my Console features in a bit more detail...

1. I always found it very annoying that, after pressing the RESTORE button and moving to another frequency, I couldn't easily return to my original frequency. I fixed this annoyance by making the RESTORE button toggle frequencies. Press it once, you go to the new (stored) frequency. Press again, you return to the frequency that you were on.

2. The front panel Record and Playback buttons are fairly self-explanatory. Press REC to record off-the-air audio. Stop recording by pressing REC again. Then, to playback during XMIT, press Play while transmitting. You don't need to do anything else (no file names to select: it's very painless). Several things also happen simultaneously when playing back: 1) The MON button turns on so that you can hear what's being played back, and 2) the TX EQ is temporarily turned OFF so that its settings don't affect the playback audio. At the end of playback both of these buttons are returned to their original states.

Each time you press REC, the record file is overwritten with new data (only one file is used, and it's reused each time you record). And, upon launching of the Console, the software assumes that the file doesn't exist (and thus the PLAY button is grayed-out). You won't be able to play anything back until you first record something.

3. The "RxFilt>Tx" button simply transfers the RX filter parameters into your TX filter. This is very convenient if some QRM has popped up and you want to ensure that you don't interfere with them, or if you want to, say, go wideband quickly. Please note that these Tx filter settings are *not* saved, and they'll disappear when changing modes. (I recommend that you always have the "Display TX Filter" box checked, so that you can always see your TX filter on the display).

4. Snp, Clr, and Pk: These three buttons are useful for signal analysis, and they do the following:

SNP: takes a "snapshot" of the display line. Very useful for comparing signals. Note that you can set the color of this line (via Setup), and, when the snapshot is present, you'll see a little inverted triangle on this line at the 'x' location of the cursor. The "cursor" readout (lower left of the display) will show the signal level of the snapshot at this triangle location.

CLR: Clears the snapshot. It turns Orange if a snapshot is present in the display.
PK: This locates the peak of the signal within +/- 10 pixels of the cursor 'x' location (shown with an inverted triangle), and displays the amplitude and frequency of this peak in the cursor values at the lower left of the display. The +/- 10 pixel borders are displayed with dashed lines. If SNP is not on (but PK is) this feature locates the peak of the normal signal within the +/- 10 pixels. If

SNP is on, it locates the peak of the snapshot within the +/- 10 pixel area.

Note: In PK mode, if the cursor isn't being moved, the values in the "cursor" readout update at the same rate as the "peak" readout at the lower right of the display. The Flex software sets this update period to 500 msec as a default. To speed-up this update rate, go to the appropriate Flex setup menu and change the setting of the Peak update rate. (If the cursor *is* moving, the update rate ofthe cursor readout will be much quicker.)

5. Peak needle on the edge s-meter: Now there is one, and its color can be changed via Setup.

6. SAM Lock: If you operate boatanchor AM nets in which everyone is off frequency (sometimes wildly off frequency!), you'll quickly find that the stock SAM feature can lock (if it locks at all) very slowly when one station stops transmitting and another starts. Meanwhile, you'll hear its carrier and the talker will be incomprehensible. Very annoying!

What would you normally do in this situation? You'd retune your receiver to the frequency of the new station. Hmmm...why not automate this?

Yeah, I know...it isn't elegant, but it works. If SAM Lock is ON, what happens is this:

The algorithm searches for the strongest signal within the SAM Lock window (the boundaries of this window are shown in the display when SAM Lock is on - color adjustable in the Setup menu). Once the peak signal is found, the program will automatically adjust the receiver's RIT to zero beat that peak.

If the peak is lost or fades (and a sideband becomes dominant, for example), the algorithm will "wait" before looking for a new peak to lock to (this waiting period is set by the Unlock Count in the Setup menu), just to ensure that it's not a brief fade of the signal.

Or, if a new strong signal appears within the SAM Lock window (for example, maybe someone tuning up), the SAM Lock will "wait" before changing the RIT to zero-beat that signal (this wait is set by the Lock Count in the Setup menu).

"Waits" are calculated in "display refresh" frames. In other words, if you set the Lock Count to 5, the lock wait time will be 5 frames. At a frame rate of 15 frames-per-second, this would therefore be 1/3 of a second. (I normally run my frame rate at 30 frames per second. It looks more natural to me.)

7. And, of course, there's the new combined Panadapter/Waterfall display as one of the display options. (And please note that, as of 7 January 08, there's a trackbar in the Setup>Appearance menu that let's you set the size of the panadapter window when in this display mode.)

I think that covers it!

Saturday, January 5, 2008

K6JCA Console now on the Flex SVN site

The K6JCA Console (and code) can be found on the Flex-radio SVN site. They're in the "Branches" folder, under "k6jca". If you aren't already using their SVN update process, please go to the FlexRadio website and search on "SVN" for additional details.

Features include:

1. Combined Panadapter/Waterfall display mode.
2. Front panel Record and Playback buttons (that are easy to use!)
3. Peak needle for the Edge S-Meter
4. Ability to take a "snapshot" of the panadapter data line and display it along with the normal data line.
5. Identify Peaks within +/- 10 pixels of the cursor's 'x' coordinate (like the SR760 spectrum analyzer does).
6. SAM Lock - locks and zero beats the strongest signal (by automatically adjusting RIT) within a frequency "window". Great for Boatanchor nets where no one is on frequency (Flex's "stock" SAM PLL can take a looong time to lock sometimes. This gets around that problem).
7. The 'Restore' button now toggles between the "stored" frequency and the frequency you were last on. In other words, if you press RESTORE once, you go to the "stored" frequency. If you press it again, you go back to where you were. (Very useful!)

(Additional information can be found in the posts below...)

Friday, January 4, 2008

Cool Fading Visual...

The waterfall half of my new Console displays some interesting things of which I was completely unaware. Recently I was talking with some friends on 75 meters, and I noticed an interesting effect...

On some stations, the waterfall looked, over time, as though a "comb" had been dragged through it. That is, it looked as though the tines of a comb had been run diagonally through the signal. I assumed that what I was seeing was due to the pitch (and harmonics) of the talker's voice changing with time, and I didn't think much more about it, except to note that it looked interesting.

Several days later I was monitoring a local boatanchor AM net, and I noticed the same thing. Again, it looked like comb tines had been dragged diagonally through the entire AM signal. What was unexpected, though, was that the direction of the drag was the same on both sidebands. What did this mean? Well, it meant that my initial assumption that the drag marks were due to voice pitch changing was wrong, for if they had been due to voice pitch changes, then the drag marks would have had the opposite slope on the other sideband. That is, if the drag marks were moving towards the carrier (with time) in one sideband, (indicating pitch lowering over time), then they should also be moving towards the carrier in the other sideband (that is, the sign of the slope should have changed in the other sideband).

But, surprise! The drag marks continued in the same direction across both sidebands!

What did this mean?

After watching the signal for a bit, I noticed that the carrier on the panadapter display would drop slightly as a "drag mark" reached the carrier. Bingo! I suddenly realized that what I was seeing was an example of fading - specifically, "selective fading"as it moved through the AM signal (this is a phenomena anyone who has listened to shortwave AM broadcasts is familiar with).

Below is a screen shot showing the fading with time on a shortwave AM broadcast station. (Click on it to blow it up). Looks like a comb was dragged through the spectrum, doesn't it?

Pretty cool, eh?

(What was also interesting, but not shown well in this image, is that the AM signal to the left also has "drag marks," but that these drag marks have a different slope and spacing, indicating a different selective fading pattern due to the different propagation path.)